Quick Engineering Takeoff: Tiling Over Concrete Slabs
To lay durable ceramic or porcelain tile over concrete: ensure the slab has cured a minimum of 28 days, has a moisture emission rate under 3 lbs/1,000 sq ft/24 hrs (ASTM F1869), and meets flatness tolerances of 1/8 inch in 10 feet for Large Format Tiles (ANSI A108.02). Always isolate non-structural shrinkage cracks using an ANSI A118.12 uncoupling membrane, use a polymer-modified ANSI A118.4 or A118.15 LHT mortar with straight directional trowel ridges, and install 1/4-inch soft perimeter silicone joints per TCNA Detail EJ171.
1. Concrete Slab Evaluation: Moisture Vapor Testing and Surface Profiling
A concrete slab-on-ground is a porous, breathing sponge. Even when a slab appears bone dry on its top surface, upward hydraulic hydrostatic vapor drive can loosen thinset mortar bonds, push efflorescence crystals into grout lines, and emulsify improper adhesives.
Before installing tile or membranes, contractors must verify two moisture metrics:
- Calcium Chloride Moisture Vapor Emission Rate (ASTM F1869): Measures vapor transmission through the slab surface. Standard thinset mortar installations permit up to 3.0 to 5.0 lbs per 1,000 square feet per 24 hours. If rates exceed 5.0 lbs, an epoxy moisture mitigation barrier is required.
- In-Situ Relative Humidity Probes (ASTM F2170): Measures internal slab relative humidity using drilled probes set at 40 percent of slab depth. Internal slab humidity must remain below 75 to 80 percent RH for standard direct-bond assemblies.
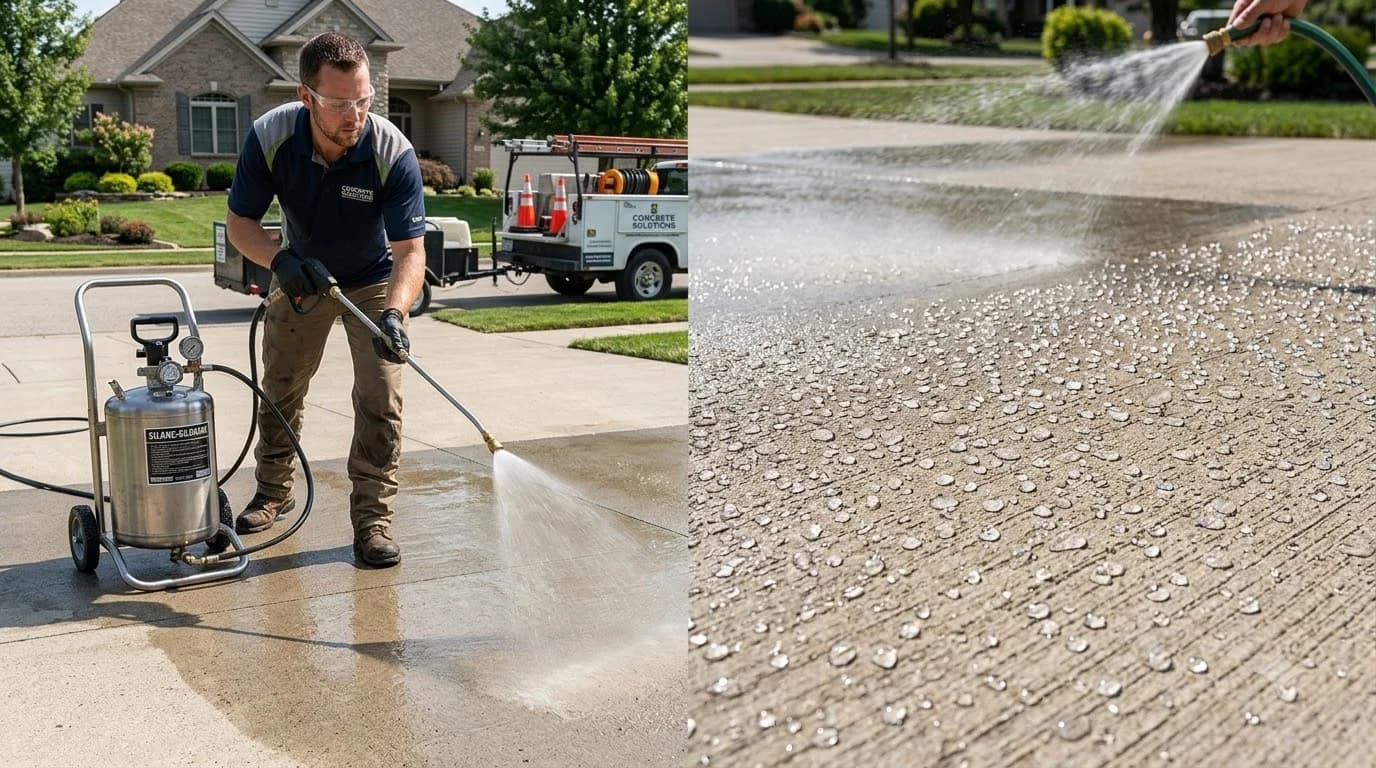
Surface Profiling (CSP 2 to 3): Curing compounds, form oils, sealers, wax, grease, and drywall joint compound act as bond breakers. Perform the “water droplet test”: sprinkle water drops across the concrete. If water beads up instead of soaking into the pores within 60 seconds, mechanical diamond cup grinding or shot blasting is required to produce a Concrete Surface Profile (CSP 2 or 3 per ICRI guidelines) before applying mortars.
2. Subfloor Flatness Standards: Grinding High Spots & Self-Leveling Underlayment
The explosive popularity of Large Format Tiles (LFT)—defined by ANSI as any tile having at least one edge measuring 15 inches or greater(such as 12×24, 24×24, or 24×48-inch porcelain planks)—has rewritten subfloor preparation requirements. Because large tiles cannot bend over humps or conform to dips, an unlevel slab creates severe “lippage” (vertical edge misalignment where one tile edge stands higher than its neighbor) and massive hollow voids under the center of tiles.
Under ANSI A108.02 Section 4.1.4.3.1, the allowable slab tolerance for Large Format Tile is strictly:
- Standard Tile (< 15"): Maximum variation of 1/4 inch in 10 feet (6 mm in 3 m) and 1/16 inch in 12 inches from high spots.
- Large Format Tile (≥ 15"): Maximum variation of 1/8 inch in 10 feet (3 mm in 3 m) and 1/16 inch in 24 inches from high points.
To achieve this plane, place a 10-foot aluminum straightedge across the slab in multiple directions. Mark high crowns with lumber crayon and grind them down using a dust-shrouded handheld diamond grinder connected to an OSHA-compliant HEPA vacuum. For low birdbaths exceeding 1/8 inch, prime the concrete with an acrylic latex primer and pour a high-strength self-leveling cementitious underlayment (SLU) rated at 4,000+ PSI.
3. Crack Isolation Membranes vs. Geometric Uncoupling Mats
Concrete slabs shrink, curl, and crack over their service lives. If tile is adhered directly to a concrete slab with thinset mortar (the direct-bond method, TCNA F113), any subsequent shrinkage fissure in the slab will transfer directly up into the mortar and fracture the brittle ceramic tile above it.
Elastomeric liquid-applied or rubberized peel-and-stick membranes bridge static and micro-shrinkage cracks up to 1/8 inch wide. The elastomeric core absorbs in-plane lateral tension through internal shear deformation, preventing the crack from transmitting upward into the tile field. They are ideal for high-traffic commercial hallways and narrow residential rooms.
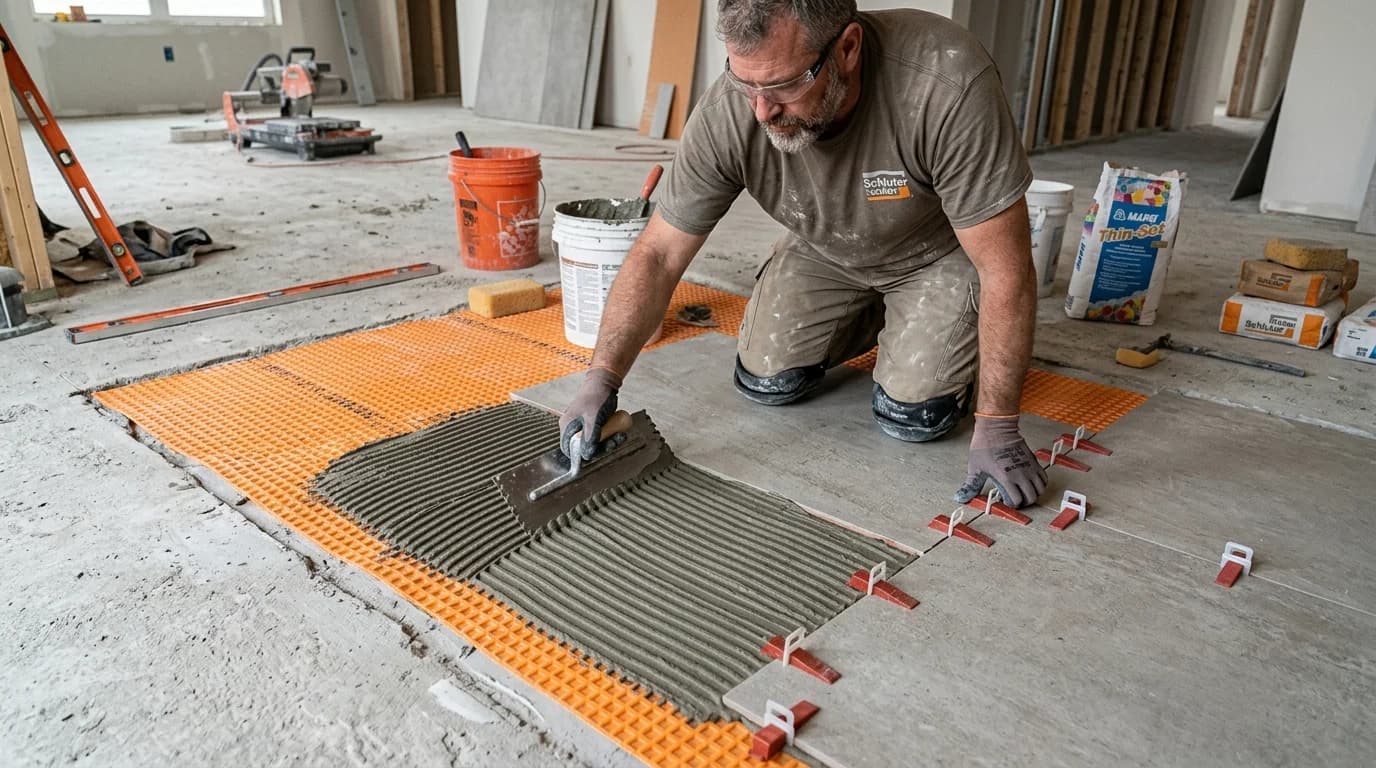
Engineered uncoupling membranes feature an open grid structure of square cutback cavities bonded to an anchoring fleece backing. When thinset fills the column cavities, the mat creates an independent mechanical shear plane: the concrete substrate and the tile assembly can expand and contract completely independently without transmitting shear stress, while supporting immense vertical point loads.
Tile Format, Trowel Sizing, Mortar Spec & 2026 Cost Matrix
Comprehensive specification matrix matching tile dimensions to notch trowel sizes, ANSI mortar classifications, membrane requirements, and 2026 installed costs:
| Tile Format & Material | Notch Trowel Size | ANSI Mortar Spec | Membrane System | 2026 Turnkey Cost/Sq Ft |
|---|---|---|---|---|
| Standard Ceramic (6" to 12") | 1/4" × 3/8" Square Notch | ANSI A118.4 Modified Thinset | Direct Bond or ANSI A118.12 | $9.00 – $13.50 |
| Porcelain Tile (12" × 24" LFT) | 1/2" × 1/2" Square Notch | ANSI A118.4 / A118.15 LHT Mortar | Uncoupling Mat (TCNA F128) | $12.00 – $17.50 |
| Large Format Wood Plank (8" × 48") | 1/2" × 1/2" with Back-Butter | ANSI A118.15 Improved LHT | Uncoupling Mat + Lippage Clips | $14.00 – $20.00 |
| Natural Marble / Granite Slabs | 1/2" × 1/2" Deep Notch | ANSI A118.15 White Fast-Setting | Heavy Commercial Uncoupling Mat | $18.00 – $28.00 |
| Gauged Porcelain Panels (3' × 10') | Euro-Notch / Slant Notch | ANSI A118.15 Polymeric Specialized | Full Acoustic Uncoupling Assembly | $25.00 – $40.00+ |
4. Thinset Mortar Mechanics: Directional Troweling and Back-Butter Coverage
Improper trowel technique is the single leading cause of cracked tile and hollow sounds on concrete floors. Troweling in swirling circular patterns creates curved air pockets that become permanently trapped when the tile is pressed into place. Under foot traffic, these unsupported air pockets collapse, fracturing the tile above.
Professional contractors follow the directional troweling protocol (ANSI A108.5):
- Burn-In the Mortar: Using the flat side of the steel trowel, key mortar aggressively into the clean concrete pores to maximize mechanical mechanical grip.
- Comb in Straight, Parallel Lines: Hold the notched trowel at a consistent 45-degree angle and comb mortar ridges in straight, parallel lines. Always comb ridges perpendicular to the long side of rectangular tiles so air has the shortest travel distance to escape.
- Mandatory Back-Butter Pass: For any tile larger than 8×8 inches, use the flat edge of the margin trowel to spread a thin 1/32-inch skim coat (“back-butter”) of wet mortar across the entire back face of the tile. This fills microscopic manufacturing texture and guarantees 100% bond.
- Collapse the Ridges: Set the tile into the wet mortar ridges and slide it firmly back and forth 1/8 to 1/4 inch perpendicular to the ridge direction. This collapses the peaks into the valleys, transforming ridged mortar into a solid, void-free bedding layer achieving the mandatory 85 percent minimum coverage for dry interior floors and 95 percent coverage for exterior or commercial wet floors.
5. Movement Joints: TCNA Detail EJ171 Perimeter and Field Expansion
Tile assemblies expand and contract with temperature swings and moisture fluctuations. If a tile floor is installed rigidly against bounding walls without movement relief, thermal expansion generates immense horizontal compressive thrust. The tiles have nowhere to expand, so they pop upward off the slab in an inverted “V” shape—a catastrophic failure known as tile tenting.
Under TCNA Method EJ171, movement joints are mandatory:
- Perimeter Wall Relief: Leave a minimum 1/4-inch open gap around the entire perimeter where tile abuts drywall, baseboards, door thresholds, and vertical columns. Never fill this perimeter gap with hard cement grout; leave it open beneath baseboards or fill it with color-matched 100% silicone sealant.
- Interior Field Expansion Joints: On large open concrete slabs, install flexible movement joints every 20 to 25 feet in each direction for interior conditioned spaces, and every 8 to 12 feet for exterior slabs or interior areas exposed to direct sunlight (such as sunrooms and floor-to-ceiling window walls).
- Slab Contraction Joints: Wherever a saw-cut contraction joint exists in the underlying concrete slab, that joint must carry directly through the tile assembly. Align a tile grout line directly over the slab joint and fill it with flexible silicone or polyurethane sealant rather than rigid cement grout.
6. Five Costly Mistakes to Avoid When Tiling Over Concrete
Placing five dabs of mortar on the corners and center of a tile instead of combing full mortar ridges leaves up to 60 percent of the tile suspended over open air voids. When furniture legs, ladders, or high heels step onto these hollow spots, the unbacked porcelain fractures instantly. Spot bonding violates ANSI A108 standards and voids all tile warranties.
Organic paste adhesives (Type I mastics sold in plastic tubs) cure solely by air drying. When spread between dense porcelain tile and a non-porous concrete slab, air cannot penetrate to dry the adhesive. Furthermore, any moisture vapor evaporating from the slab re-emulsifies the mastic into sticky liquid glue, causing entire tile floors to slide loose.
Concrete contraction joints are designed to move. If you mortar ceramic tile directly across a saw cut, the concrete's natural thermal contraction will shear the mortar bond and snap the tile directly above the joint line. Either honor the joint by installing a soft sealant joint directly overhead or bridge it with an engineered uncoupling mat.
Swirling a notched trowel in semi-circles creates closed rings of mortar that trap air bubbles like tiny suction cups. When the tile is set, the trapped air cannot collapse or escape, preventing the mandatory 85% to 95% mortar contact area. Always pull trowel ridges in straight, parallel lines in one direction.
Filling the joint between the edge of the tile floor and perimeter baseboards or drywall with hard cementitious grout eliminates the expansion reservoir. When summer humidity and heat cause the tile field to expand, the tiles crush against each other and “tent” violently upward off the floor. Always leave perimeter gaps open or seal with 100% flexible silicone.
Planning a Concrete Subfloor or Tile Project?
Estimate thinset mortar bags, uncoupling membrane square footage, and 2026 material costs instantly.
Frequently Asked Questions
How long must a new concrete slab cure before you can lay tile?
Under Tile Council of North America (TCNA) standards, a new concrete slab must cure for a minimum of 28 days before installing tile directly with thinset mortar. Because concrete undergoes significant volumetric shrinkage and moisture evaporation during its first 60 to 90 days, waiting 60 to 90 days—or installing an ANSI A118.12 uncoupling membrane after 14 to 21 days—is strongly recommended to prevent shrinkage stresses from debonding tile.
Can you lay tile directly onto a cracked concrete slab?
You can tile over concrete with hairline shrinkage cracks (under 1/8-inch wide) only if you install an ANSI A118.12 crack isolation membrane or an uncoupling mat (such as Schluter DITRA) between the concrete and tile. Never tile directly over in-plane cracks without a membrane, as substrate movement will mirror directly through the grout and tile, causing reflective fractures.
What type of thinset mortar is required for tiling over concrete floors?
Always use a polymer-modified dry-set mortar meeting ANSI A118.4 or ANSI A118.15 (improved modified dry-set mortar). For large format tiles (any side 15 inches or greater), specify an ANSI A118.4 Large and Heavy Tile (LHT) mortar that supports heavier tile weight without slumping into the trowel ridges. Never use pre-mixed organic tub mastic on concrete floor slabs.
What are the floor flatness requirements for large format porcelain tile?
Under ANSI A108.02 Section 4.1.4.3.1, floors receiving Large Format Tile (tiles with any edge 15 inches or longer) must have a maximum variation of no more than 1/8 inch in 10 feet from the required plane, and no more than 1/16 inch in 24 inches from high points. Slabs with excessive dips require diamond grinding or application of self-leveling cementitious underlayment before tiling.
Why must expansion joints be carried up through the tile and never grouted?
Concrete slabs expand, contract, and curl with seasonal temperature and humidity swings. Per TCNA Detail EJ171, cold joints, saw-cut contraction joints, and perimeter wall joints must be mirrored up through the tile assembly and filled with flexible 100% silicone or polyurethane sealant. Filling expansion joints with rigid cement grout locks the tile assembly, causing massive buckled tile tenting when the slab moves.
Building Codes & Primary Standards Cited
Handbook for Ceramic, Glass, and Stone Tile Installation
Tile Council of North America authoritative industry standard defining installation methods F111, F112, F125, and EJ171.
American National Standard Specifications for Modified Dry-Set Cement Mortar
Defines minimum shear bond strength, open time, and sag resistance criteria for polymer-modified tile adhesives.
Standard Test Method for Determining Relative Humidity in Concrete Floor Slabs
Governs in-situ relative humidity probe placement, calibration, and moisture tolerance criteria for resilient and hard tile floorings.
Estimations adhere to standard North American modular 3/8-inch mortar joint physics and 5% to 10% material waste factors. Local municipal building inspectors, stamped architectural blueprints, and local frost depth requirements supersede general reference guidelines.
Popular Quick Estimates
Pre-engineered takeoffs & benchmarks matched to this project
Related Calculators
Specialized tools for foundation, core fill, and budgeting
Cubic yards, bags, and slab volume for flatwork and footings
Heavyweight structural blocks and bond beam units
Core grout volume in cubic yards and 80-lb pre-mix bags
Cell fill requirements for low-lift and high-lift grouting
Blogs & Construction Guides
Technical articles, IRC code standards, rebar schedules & freight logistics
How to Pour a Concrete Slab DIY: Formwork, Rebar & Finishing
Cost to Pour Concrete per Square Foot (2026 Price Guide)
Concrete Slab Calculator: Bags & Yards for All Slabs