Quick Contractor Protocol: Chisel Vertical Keyways, Clamp Rigid Forms, Never Feather-Edge
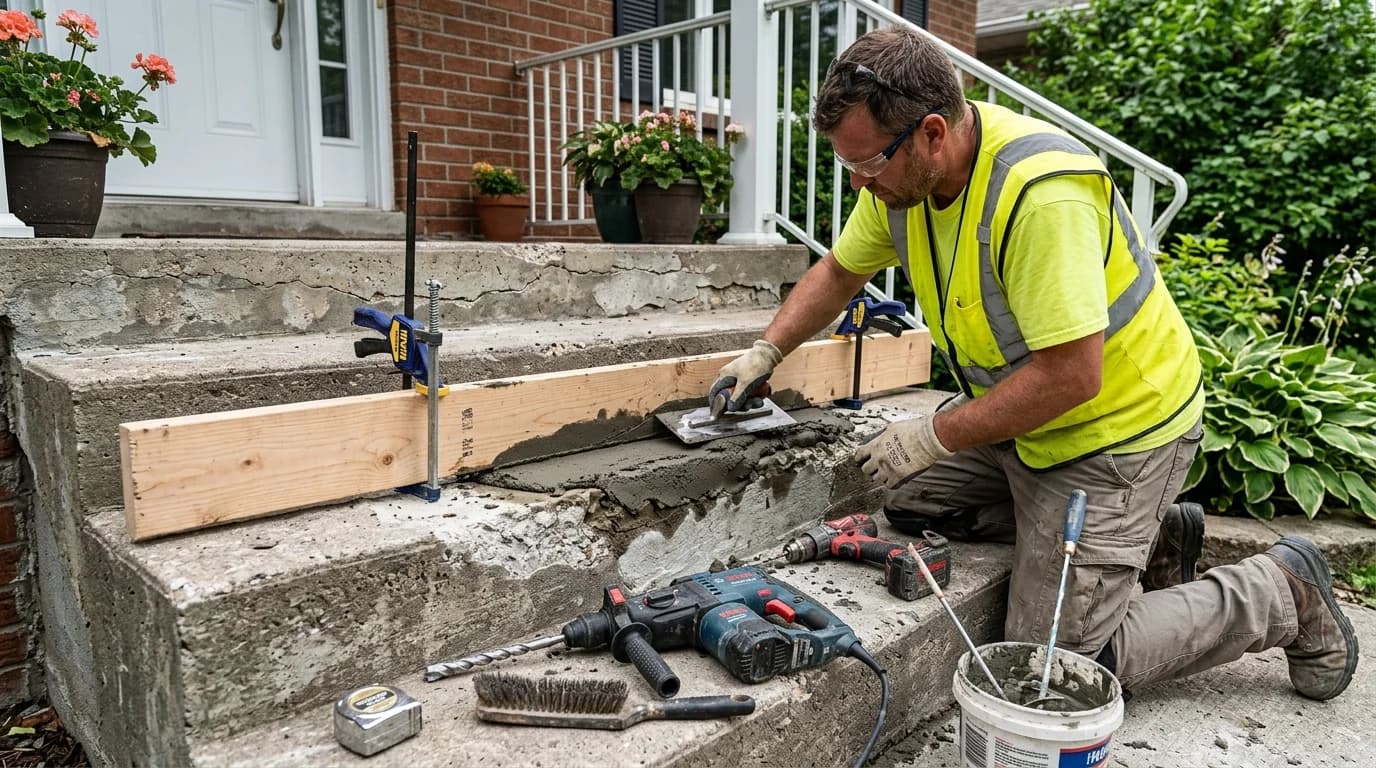
Step repairs fail when wet mortar is buttered onto fractured corners with a tapered zero-edge. You must chisel or saw-cut the broken area back to sound concrete with a minimum 1/2-inch vertical shoulder. Anchor a straight 2x6 form board against the riser face, saturate the concrete to SSD condition, scrub an ASTM C1059 acrylic bonding slurry into the pores, pack an ASTM C928 rapid-hardening polymer mortar, and tool a rounded 1/2-inch radius nose.
1. Why Concrete Steps Fail (Freeze-Thaw & Edge Shear Loads)
Stairways endure the most aggressive mechanical impact and environmental punishment of any residential concrete element. Under ACI 546R (Concrete Repair Guide), stair degradation typically accelerates through three interrelated failure modes:
Nosing Edge Shear Impact: When people ascend or descend stairs, body weight is concentrated onto the outer 1 to 2 inches of the step tread (the nosing). Standard unreinforced concrete has modest tensile strength (roughly 10% of its compressive strength). Concentrated pedestrian impact creates high localized shear stresses that crack unanchored corners.
Deicing Chemical Attack & Freeze-Thaw Saturation: Winter deicing salts (sodium chloride and calcium chloride) melt snow into liquid brine. This brine penetrates porous step concrete. When temperatures drop below the brine freezing point, water expands by 9% inside the capillary pores. This hydraulic pressure exceeds the tensile strength of the cement paste, fracturing aggregate bonds and causing severe surface scaling and popouts.
Sub-Base Soil Settlement: Exterior entry stoops are often poured over loose backfill around foundation walls. As backfill naturally consolidates over 5 to 10 years, unsupported concrete stoops settle unevenly, opening horizontal separation cracks and causing stair treads to slope back toward the building foundation.
2. Concrete Step Damage Severity & Material Takeoff Matrix
Select the appropriate repair methodology based on structural depth, location of failure, and safety compliance:
| Damage Classification | Defect Depth | Structural Impact | Recommended Repair Material | Formwork Required | Expected Durability |
|---|---|---|---|---|---|
| Surface Scaling & Pitting | 1/16 in to 1/4 in | Aesthetic & light trip hazard | Polymer-modified cementitious resurfacer | None (Edge tape only) | 5 to 8 Years |
| Chipped Step Nose / Edge Break | 1/2 in to 2-1/2 in | Moderate trip & liability hazard | ASTM C928 rapid polymer repair mortar | Clamped 2x6 face board | 10 to 15 Years |
| Full Corner Spall / Exposed Rebar | 2 in to 5 in | High structural deterioration | Structural micro-concrete + zinc epoxy rebar primer | Full braced wooden box form | 15+ Years |
| Riser Shear Settlement | Over 2 in drop | IRC Code violation & fall hazard | Polyurethane foam injection (Polyjacking) or rebuild | Full form rebuild | 20+ Years |
3. Building Code Requirements (IRC Section R311.7)
When repairing or reshaping concrete steps, you must comply strictly with municipal residential building codes. Stair dimensions directly dictate pedestrian safety and municipal liability:
- Maximum Riser Height: Under IRC Section R311.7.5.1, the maximum riser height cannot exceed 7-3/4 inches (196 mm). The riser is measured vertically between leading edges of adjacent treads.
- Minimum Tread Run: Under IRC Section R311.7.5.2, the minimum tread run is 10 inches (254 mm), measured horizontally between vertical planes of nosings.
- Uniformity Rule (3/8-Inch Rule): The greatest riser height within any flight of stairs shall not exceed the smallest by more than 3/8 inch (9.5 mm). The same 3/8-inch maximum variation applies to tread depths. Even a 1/2-inch deviation causes human gait disruption, leading to severe trips and falls.
- Tread Slope & Drainage: Outdoor step treads must maintain a slight downward pitch away from the structure (approximately 1/8 to 1/4 inch per foot) to shed rainwater and melting snow, preventing ponding and ice formation.
4. Step-by-Step Step Reconstruction Protocol
Follow this contractor-proven 6-step protocol to rebuild chipped step edges and risers permanently:
- Mechanical Chipping & Undercutting: Use a cold chisel, 3-lb sledgehammer, or small SDS rotary demolition hammer to remove all fractured, unsound concrete. Chisel back until you strike solid, sound aggregate. Cut a vertical shoulder at least 1/2 inch deep along the perimeter of the break. Never feather-edge the repair to a zero slope. If possible, undercut the parent concrete slightly inward to create a mechanical dovetail lock.
- Substrate Cleaning & Steel Rebar Treatment: Thoroughly wire-brush the repair zone to strip loose paste, carbonation, and dirt. If embedded rebar or wire mesh is exposed, chip concrete back to expose at least 3/4 inch behind the bar. Wire-brush the steel to bare metal (SSPC-SP 3) and coat with a corrosion-inhibiting zinc-rich epoxy primer.
- Rigid Riser Formwork Setup: Cut a straight 2x6 or 2x8 dimensional board to the exact width of the step riser. Coat the inner face with form release oil, vegetable oil, or wrap it in heavy wax paper to prevent the fresh mortar from sticking. Position the board flush with the existing riser face and level with the top tread surface. Secure the form rigidly using bar clamps, heavy cinder blocks, or masonry Tapcon screws anchored into the cheek walls.
- Saturated Surface-Dry (SSD) & Primer Application: Thoroughly soak the prepared concrete cavity with water for at least 15 to 30 minutes. Immediately prior to packing mortar, blow or sponge away all standing water puddles. The substrate must be in a Saturated Surface-Dry (SSD) condition—damp and dark, but with zero free surface water. Brush an un-diluted coat of ASTM C1059 Type II acrylic bonding primer or scrub a thin slurry of the repair mortar directly into the open pores.
- Placing & Consolidating Mortar: Mix an ASTM C928 Class R2/R3 rapid-setting repair mortar with clean potable water to a stiff, packable putty consistency (low slump). Forcefully pack the mortar into the cavity using a margin trowel, ensuring zero voids or air pockets along the wooden form. Overfill the repair by approximately 1/8 inch, then strike off flush with the top tread using a straightedge wood screed.
- Form Stripping & Nose Radius Tooling: Allow the mortar to set for 45 to 75 minutes until thumb pressure leaves only a faint indentation. Carefully loosen clamps and strip the wooden riser form. Use a curved 1/2-inch radius bronze step edger tool along the nosing corner to create a smooth, durable rounded edge. Lightly rub the exposed vertical riser face with a damp sponge or wooden float to blend the patch seamlessly with the surrounding concrete.
5. Proper Curing, Sealing & 2026 Repair Costs
Rapid-setting mortars generate high hydration heat. If moisture evaporates prematurely, shrinkage micro-cracks will ruin the bond. Cover the freshly repaired step with damp burlap and 4-mil plastic sheeting for 24 to 48 hours, or spray an ASTM C309 curing compound.
Penetrating Breathable Silane Sealer: After the patch cures for 28 days, treat the entire stair assembly with a penetrating silane/siloxane water repellent. Unlike impermeable acrylics or paints that trap rising vapor and freeze, silane penetrates 1/4 inch into concrete pores, creating a hydrophobic chemical barrier that repels wind-driven rain and deicing brines while allowing water vapor to escape freely.
2026 Cost & Takeoff Economics: Rebuilding 2 or 3 chipped step corners DIY requires approximately $65 to $95 in materials (one 20-lb pail of rapid repair mortar at $28, a quart of acrylic bonding agent at $16, an edging tool at $14, and scrap lumber). A licensed masonry contractor will bill between $350 and $850 to restore broken edges across an exterior flight of 3 to 4 steps. Full precast step replacement or site-poured stairs ranges from $1,800 to $4,200 depending on handrail complexity and site excavation.
5 Costly Concrete Step Repair Mistakes to Avoid
1. Feather-Edging Mortar to a Zero Edge
Troweling mortar over sloping, un-cut concrete creates paper-thin edges that lack structural body. Always chisel a vertical 1/2-inch mechanical keyway so the repair material has sufficient mass to resist impact and shear.
2. Placing Fresh Patch on a Bone-Dry Sieve
Dry existing concrete acts like a thirsty sponge, rapidly sucking the mixing water out of fresh mortar before cement crystals can hydrate. Always pre-soak the parent concrete to a Saturated Surface-Dry (SSD) condition.
3. Violating the IRC 3/8-Inch Riser Rule
Over-building step treads creates uneven step heights. IRC Section R311.7 limits maximum riser height differences to 3/8 inch. Uneven stairs violate municipal housing codes and represent severe homeowner liability.
4. Leaving Riser Forms on Too Long
If wooden riser forms are left on for hours, the mortar sets rock-hard, making it impossible to tool a rounded bullnose or sponge-float the riser face to blend with the original concrete texture. Strip within 45 to 75 minutes.
5. Spreading Rock Salt on Fresh Concrete Repairs
Chemical deicers (sodium chloride, calcium chloride, magnesium chloride) cause severe osmotic pressures in young cement paste. Never apply chemical deicers to fresh step repairs during the first two winter seasons; spread clean sand for traction instead.
Planning to Pour or Rebuild Concrete Steps?
Calculate total cubic yards, bagged concrete mix, risers, treads, and 2026 material costs with precision.
Frequently Asked Questions
Why do repaired step edges break off again after only one winter?
Step edge patches fail when the repair material was feather-edged to a paper-thin margin, applied over dry dusty concrete without Saturated Surface-Dry (SSD) preparation, or laid without an undercut 1/2-inch mechanical keyway. Thin edges lack tensile strength and pop loose under foot traffic impact and freeze-thaw expansion.
What building code standards govern concrete step riser height and tread depth?
Under International Residential Code (IRC Section R311.7), maximum riser height is 7-3/4 inches (196 mm), minimum tread run is 10 inches (254 mm), and the greatest riser height or tread depth within any flight of stairs cannot exceed the smallest by more than 3/8 inch (9.5 mm).
What type of mortar should be used to rebuild structural concrete step corners?
Use an ASTM C928 Class R2 or R3 polymer-modified rapid-hardening cementitious repair mortar. These products achieve compressive strengths exceeding 2,500 psi in 3 hours and 5,000 psi in 28 days, while offering high flexural bond strength when paired with an ASTM C1059 Type II acrylic bonding primer.
When should wooden riser forms be stripped after placing repair mortar?
Strip riser face forms approximately 45 to 75 minutes after placement, as soon as the mortar achieves its initial thumb-print set but remains carveable. This allows you to immediately float, rub, and tool the vertical riser face to match the surrounding concrete texture before final hardening.
How much does it cost to repair concrete steps vs. replacement in 2026?
DIY edge and riser repair kits cost $50 to $110 in materials (polymer mortar, bonding agent, form lumber, and tools). Professional masonry repair services average $350 to $850 for a standard 3-to-4 step stoop. Complete demolition and repouring of an exterior concrete staircase runs between $1,800 and $4,200 in 2026.
Building Codes & Primary Standards Cited
International Residential Code - Stairways
Establishes mandatory architectural limits for maximum riser height (7-3/4 in), minimum tread depth (10 in), and maximum variance (3/8 in).
Guide to Concrete Repair
American Concrete Institute standard guidelines for structural evaluation, surface preparation keyways, and repair mortar consolidation.
Standard Specification for Packaged, Dry, Rapid-Hardening Cementitious Materials for Concrete Repairs
Specifies compressive strength gain (>2,500 psi at 3 hours), low volume shrinkage, and freeze-thaw durability for polymer repair mortars.
Estimations adhere to standard North American modular 3/8-inch mortar joint physics and 5% to 10% material waste factors. Local municipal building inspectors, stamped architectural blueprints, and local frost depth requirements supersede general reference guidelines.
Popular Quick Estimates
Pre-engineered takeoffs & benchmarks matched to this project
Related Calculators
Specialized tools for foundation, core fill, and budgeting
Heavyweight structural blocks and bond beam units
Cubic yards, bags, and slab volume for flatwork and footings
Masonry steps, riser heights and solid core fill volume
Core grout volume in cubic yards and 80-lb pre-mix bags
Blogs & Construction Guides
Technical articles, IRC code standards, rebar schedules & freight logistics
Why Concrete Delaminates & Scales: Causes & Repair Guide
How to Repair Spalled Concrete: Pitted & Flaking Slabs
How to Repair Cracks in Cinder Block Foundation Walls