1. The Physics: Why Basements Mold Without Rigid Foam
Concrete blocks act like giant masonry sponges. They are in direct contact with underground soil that stays at a constant 50°F to 55°F year-round and maintains high moisture content. Two scientific phenomena dictate wall performance:
Condensation at the Dew Point
Warm indoor air in a finished basement carries high relative humidity (60–70°F at 50% RH). When this humid air penetrates air-permeable fiberglass batts and hits the 52°F concrete surface, it immediately reaches its dew point and condenses into liquid droplets.
The Continuous Thermal Break
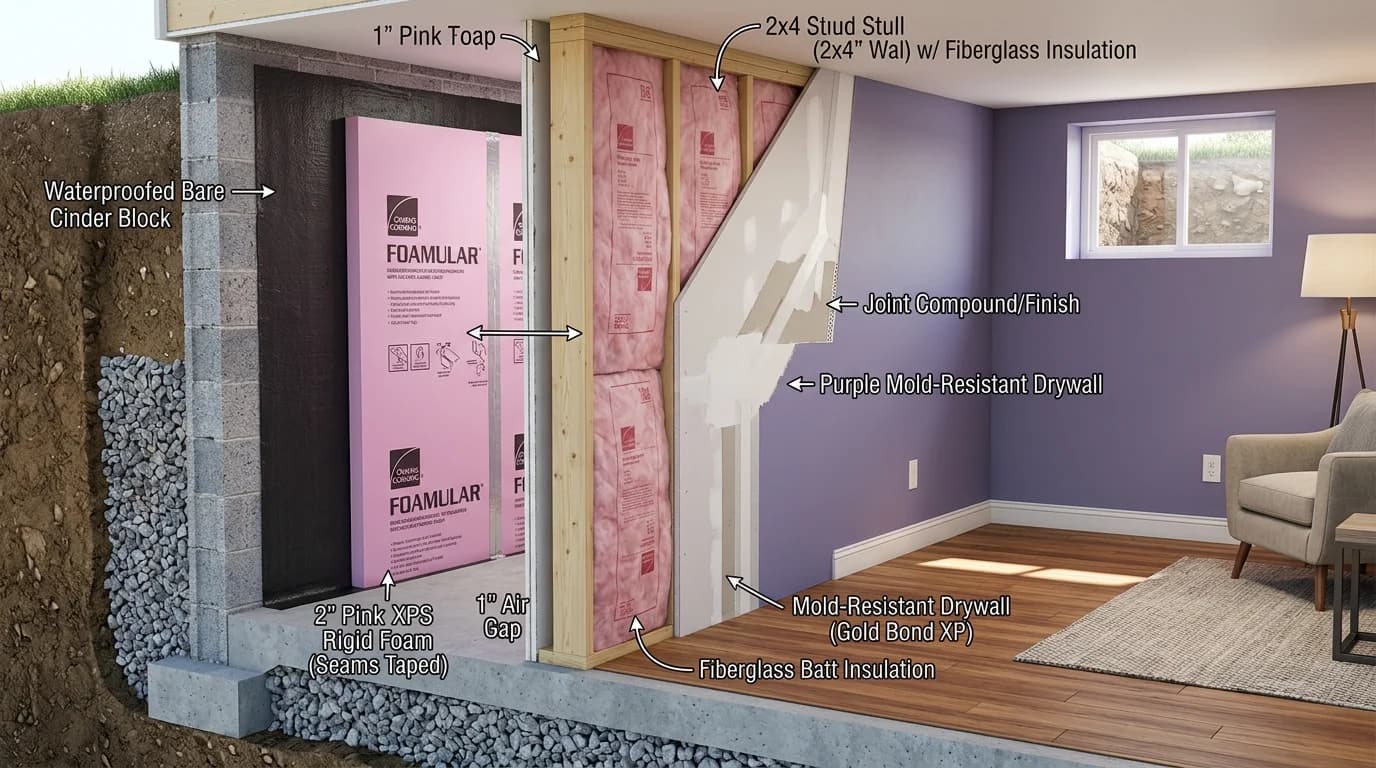
By gluing continuous Extruded Polystyrene (XPS) rigid foam directly to the block wall, the interior face of the foam warms to room temperature (65°F+). The dew point occurs entirely within the impermeable closed-cell foam, preventing liquid water from ever forming.
2. Selecting Your Rigid Foam Board: XPS vs. Polyiso vs. EPS
Not all foam insulation boards perform equally against below-grade moisture and cold temperatures:
| Insulation Type | R-Value Per Inch | Water Vapor Permeance | Pros & Cons for Block Walls |
|---|---|---|---|
| XPS (Extruded Polystyrene - Pink / Blue) | R-5.0 / in | 1.0 – 1.5 Perms (Semi-impermeable) | Contractor Gold Standard. Highly water-resistant, durable, does not absorb groundwater seepage. |
| Polyiso (Foil-Faced Polyisocyanurate) | R-6.5 / in | < 0.05 Perms (Class I Vapor Barrier) | Highest R-value per inch, but foil face traps moisture if liquid water penetrates behind it. Best for above-grade walls. |
| EPS (Expanded Polystyrene - White Beadboard) | R-3.8 / in | 3.0 – 5.0 Perms (Permeable) | Budget-friendly, but can absorb up to 4% moisture by volume, reducing thermal R-value over time. |
3. Step-by-Step Installation: From Bare Block to Drywall
Surface Prep & Crack Sealing
Inspect the bare cinder block wall. Scrape away all efflorescence (white mineral salts) with a stiff wire brush. If you find active seepage or stair-step cracks, repair them using hydraulic cement or polyurethane injection before proceeding (view crack repair guide). Roll a penetrating silane-siloxane sealer over the bare block.
Adhere Continuous XPS Rigid Foam
Apply heavy beads of foamboard-compatible construction adhesive (Loctite PL 300) in vertical ribbons every 10 inches onto the back of 2-inch 4x8 XPS sheets. Press sheets tightly against the block wall. Secure mechanically with 3-inch masonry anchors (Tapcons with 2-inch plastic washers) at top and bottom.
Air-Seal All Seams and Rim Joists
Cover every vertical and horizontal seam between foam panels with 2-1/2" contractor acrylic vapor-barrier tape (Tuck Tape or 3M 8087). Fill the top gap between the foam board and the overhead rim joist with expanding polyurethane spray foam (Great Stuff Pro) to eliminate air infiltration.
Frame the 2x4 Wood Stud Wall
Snap a chalk line on the concrete floor 4 inches away from the foam face. Lay a closed-cell foam sill gasket on the concrete, place a pressure-treated 2x4 bottom plate over it, and fasten into the slab using 2-1/2" Tapcons or powder-actuated Ramset pins every 3 feet. Frame 2x4 wall studs 16 inches on-center, securing the top plate to the overhead floor joists above.
Cavity Insulation & Drywall
After rough-in plumbing and electrical wiring are inspected, friction-fit unfaced R-13 fiberglass or Rockwool mineral wool batts into the 2x4 stud cavities. Do NOT install a plastic vapor barrier. Hang 1/2-inch mold-resistant gypsum board (purple or green board), keeping the bottom edge lifted 1/2 inch off the concrete slab floor.
4. Furring Strips vs. Floating 2x4 Stud Wall
Homeowners often ask if they can save space by screwing 1x3 wood furring strips directly over the foam into the cinder block:
Furring Strips Drawbacks: Standard 1x3 furring strips (actual 3/4" thickness) do not provide enough depth to install standard 2-1/2" or 3" deep electrical outlet boxes without chiseling out the concrete block behind them. Additionally, screws penetrating the block create thermal and moisture bridges.
Floating 2x4 Stud Advantages: A floating 2x4 wall provides a true, plumb surface even if the cinder block wall is wavy or bowed. It creates an unobstructed chase for wiring, plumbing, and HVAC ducts, and allows adding R-13 cavity insulation for a high-performance R-23 total assembly.
Calculate Square Footage & Basement Walls
Calculate square footage, block quantities, and room framing dimensions with our specialized masonry calculators.
Frequently Asked Insulation & Framing Questions
Can you put fiberglass insulation directly against cinder blocks?
No. Never install fiberglass batts directly against cold concrete block walls. Cinder blocks absorb ground moisture and remain cold (50°F to 55°F). When warm indoor air passes through fiberglass and strikes the cold block face, moisture condenses into liquid water, soaking the organic paper backing and feeding toxic black mold inside the wall cavity.
What R-value is required for basement cinder block walls?
Under the International Energy Conservation Code (IECC) and IRC Table N1102.1.3, basement continuous insulation requirements range from R-5 in warm climate zones (Zones 1-3) to R-10 or R-15 continuous rigid foam in moderate-to-cold zones (Zones 4-8), or an assembly equivalent of R-13 to R-19 cavity insulation.
Should you use 1x3 furring strips or a 2x4 stud wall?
A floating 2x4 stud wall framed 1/2 to 1 inch away from continuous rigid foam is vastly superior. Furring strips screwed directly to blocks create thermal bridges, provide inadequate depth for standard 3-inch electrical junction boxes, and can buckle if block walls are out of plumb.
Do you need a plastic polyethylene vapor barrier over the studs?
No! Installing a 6-mil poly vapor barrier over the interior studs traps moisture inside the wall cavity between the foam and the plastic, causing wood framing rot. The continuous taped XPS or Polyiso rigid foam board acts as your primary vapor retarder. Walls must be allowed to dry inward toward the room.
Building Codes & Primary Standards Cited
International Residential Code - Insulation Requirements
Specifies minimum continuous basement wall R-values (R-5 to R-15) and vapor permeance ratings by climate zone.
Standard Specification for Rigid Cellular Polystyrene Thermal Insulation
Governs physical properties, compressive resistance, and water vapor permeance for XPS insulation boards.
International Residential Code - Foam Plastic
Mandates 1/2-inch gypsum drywall thermal barrier separation between foam plastics and habitable living spaces.
Estimations adhere to standard North American modular 3/8-inch mortar joint physics and 5% to 10% material waste factors. Local municipal building inspectors, stamped architectural blueprints, and local frost depth requirements supersede general reference guidelines.
Popular Quick Estimates
Pre-engineered takeoffs & benchmarks matched to this project
Related Calculators
Specialized tools for foundation, core fill, and budgeting
Straight and multi-wall runs with mortar and waste allowances
Installed cost per square foot and full budget forecast
Gravity and reinforced walls with soil load calculations
Stem walls, crawlspace blocks and footing requirements
Blogs & Construction Guides
Technical articles, IRC code standards, rebar schedules & freight logistics
How to Build a Cinder Block Retaining Wall (IRC Guide)
How to Stucco & Parge Over Cinder Block Walls
Cost to Build a Cinder Block Wall (2026 Rates)